In-Depth

Targeting Seasonal Emails to the Right Audience

Fall is finally here, and with the changing of the seasons comes ample email marketing opportunities. For those of us in the United States, the following holidays are right around the corner:

  • Halloween, October 31st
  • Columbus Day, Second Monday in October
  • Veterans Day, November 11th
  • Thanksgiving, Fourth Thursday in November

…not to mention religious holidays and football games (but I repeat myself). But what if your subscribers are located around the globe and not just the United States? What if they are more interested in Oktoberfest or Harvest Festival, but not so much Columbus Day or Thanksgiving? In this blog post, you’ll learn how to segment your mailing list so that your fall-themed emails are sent to the right subscribers at the right time.

Use Smart Groups to Segment Your List

For the purpose of this blog post, let’s assume that you have a fall-themed email campaign lined up that’s most appropriate for your subscribers living in the United States. Maybe it’s related to Veterans Day or another holiday that’s not celebrated in other countries. How can you send your campaign to just U.S.-based subscribers? The answer is by using Smart Groups.

Smart Groups are a feature in Direct Mail that lets you filter your subscribers based on various rules/criteria that you choose. One of the supported criteria is “Most Recent Location”. Direct Mail determines the location of your subscribers based on the IP address they use to open and read your email campaigns. Let’s create a smart group that contains subscribers based in the United States:

  • Open your Direct Mail Project
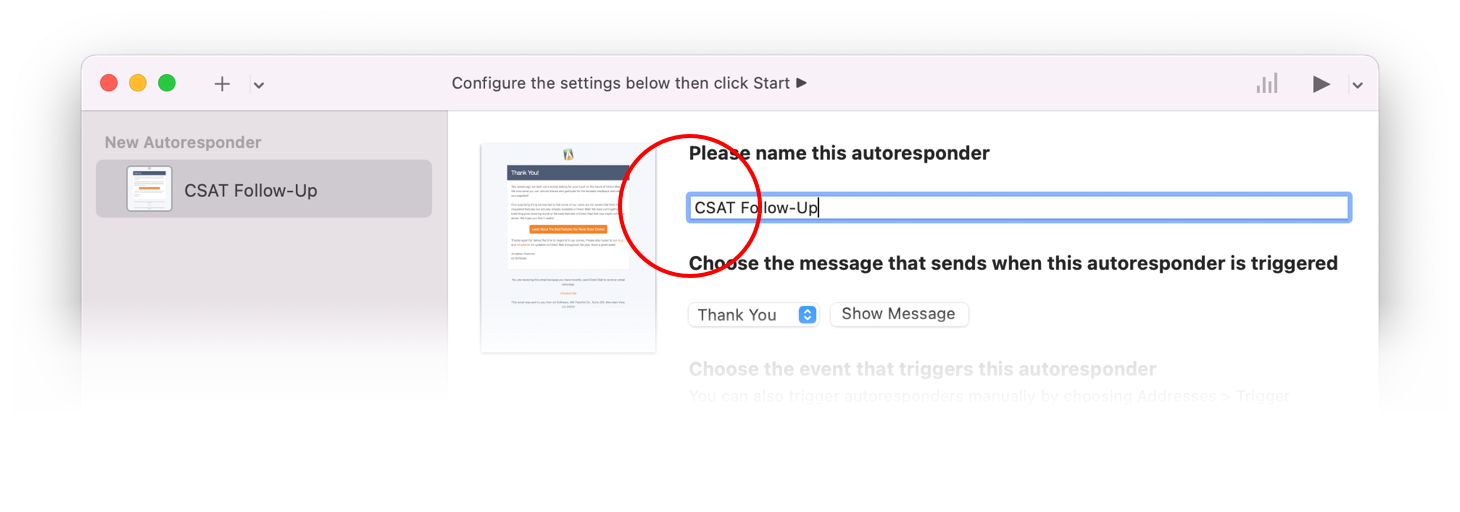
  • Choose “Addresses > New Smart Group…” from the menu bar at the top of your screen
  • Give your smart group a name (e.g. “USA Subscribers”)
  • Select the groups you want to pull from, or stick with the default setting “All Groups”
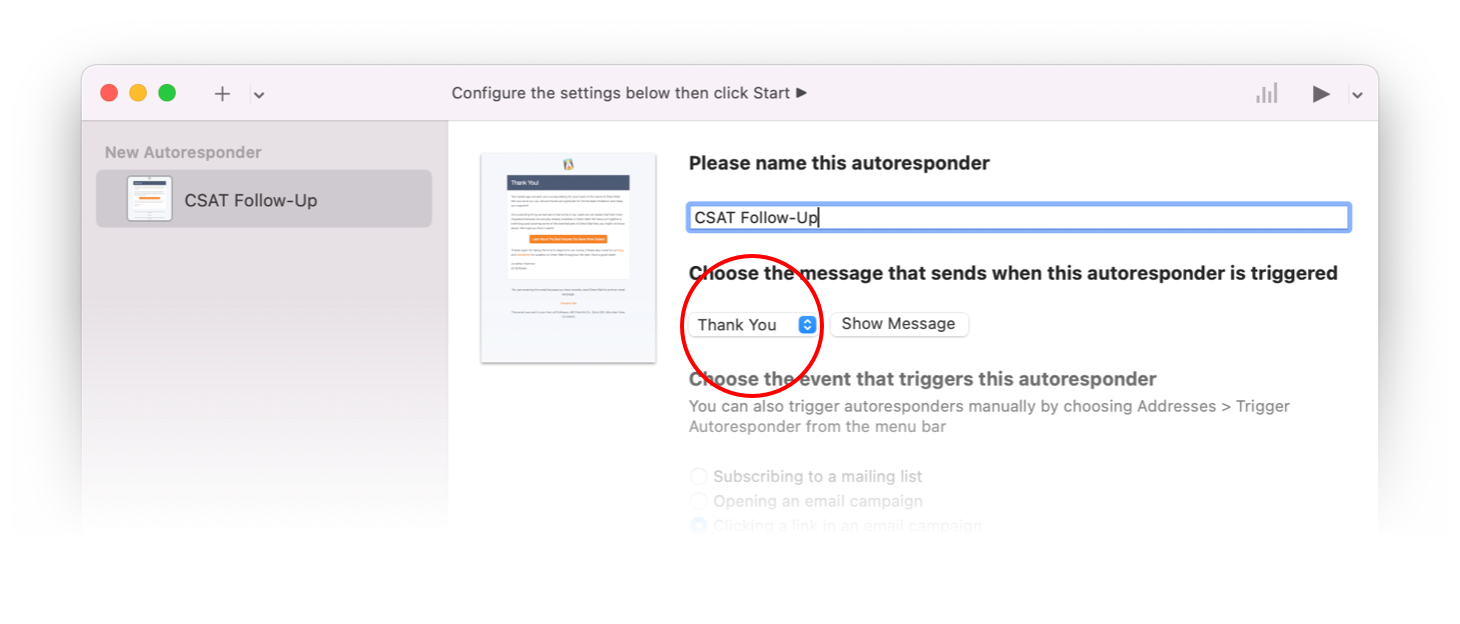
  • Now let’s set up the filtering rules. Change the “First Name” pop-up menu to “Most Recent Location – Country”
  • In the text field, enter “United States”

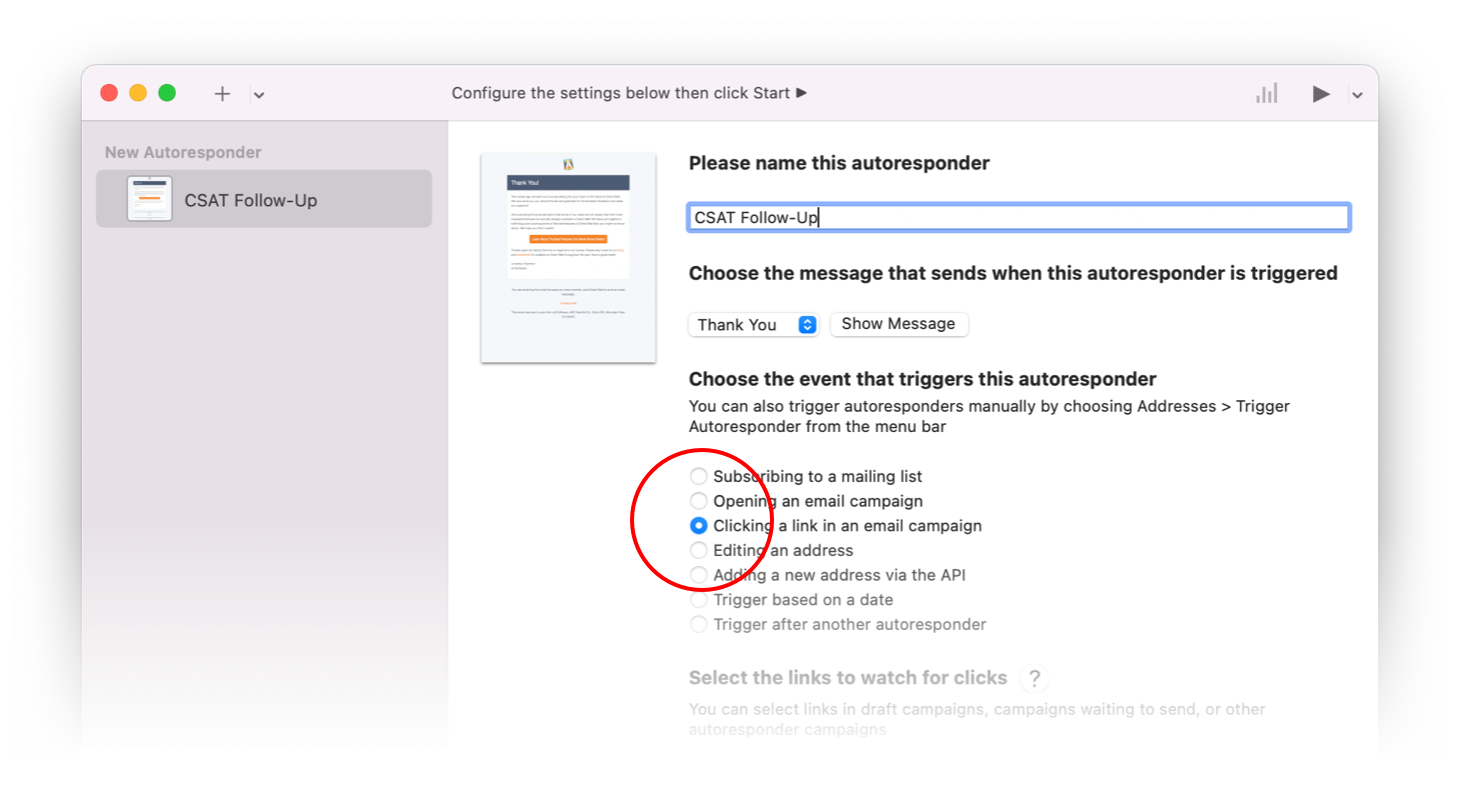
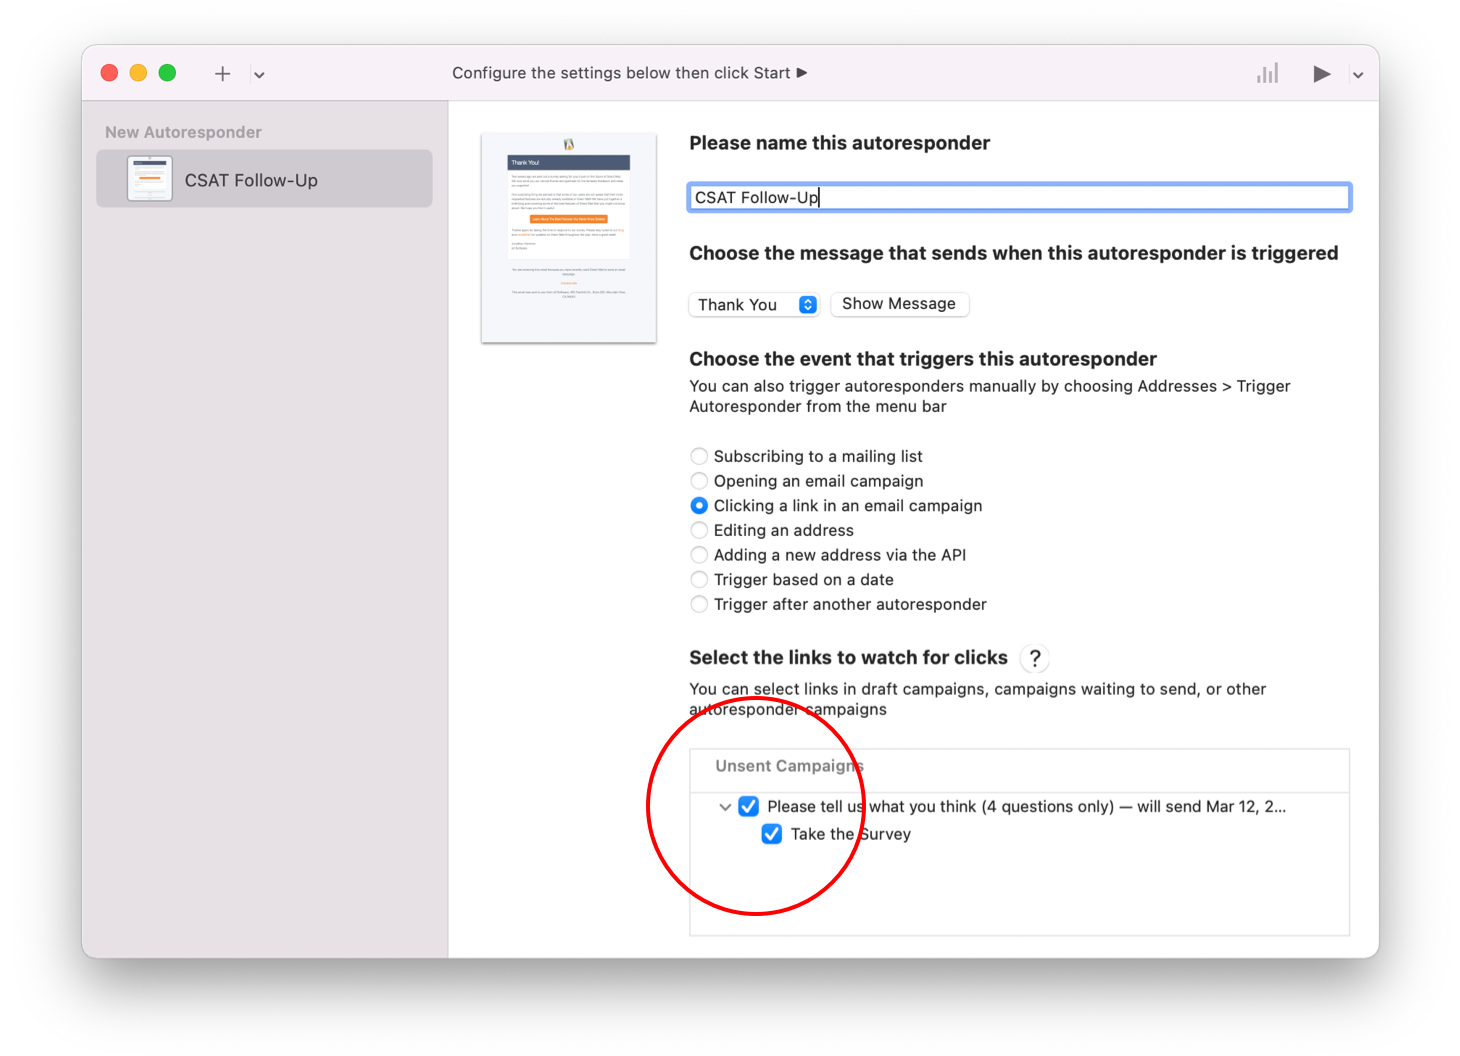
When you’re all done, the smart group settings should look like this:

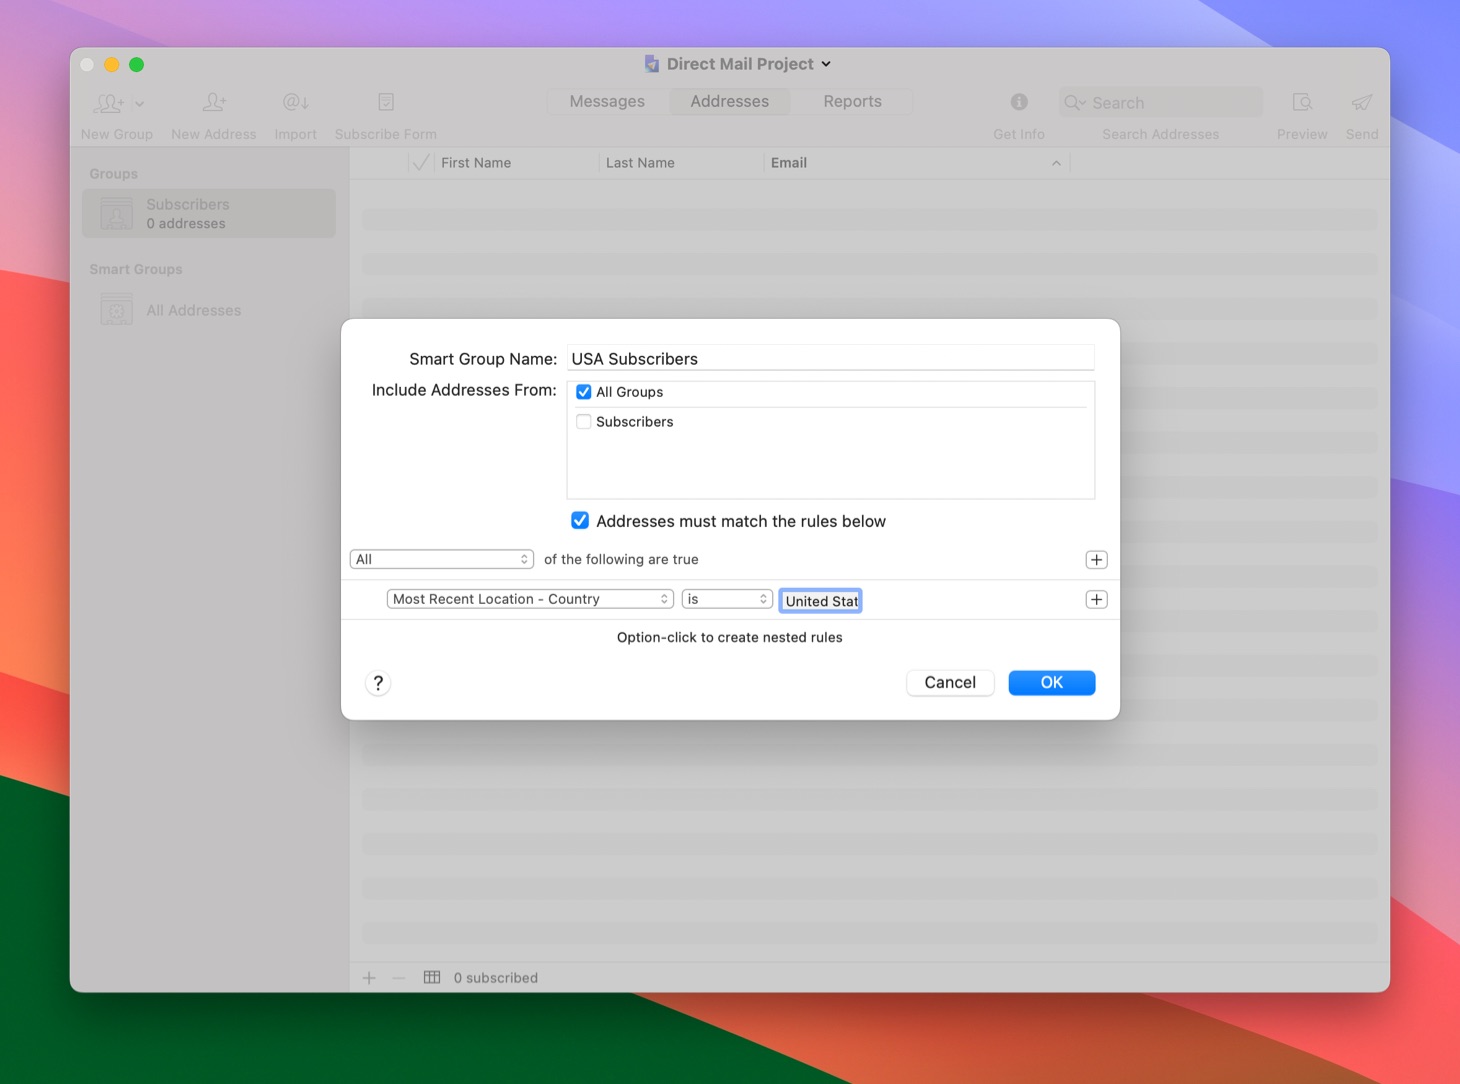
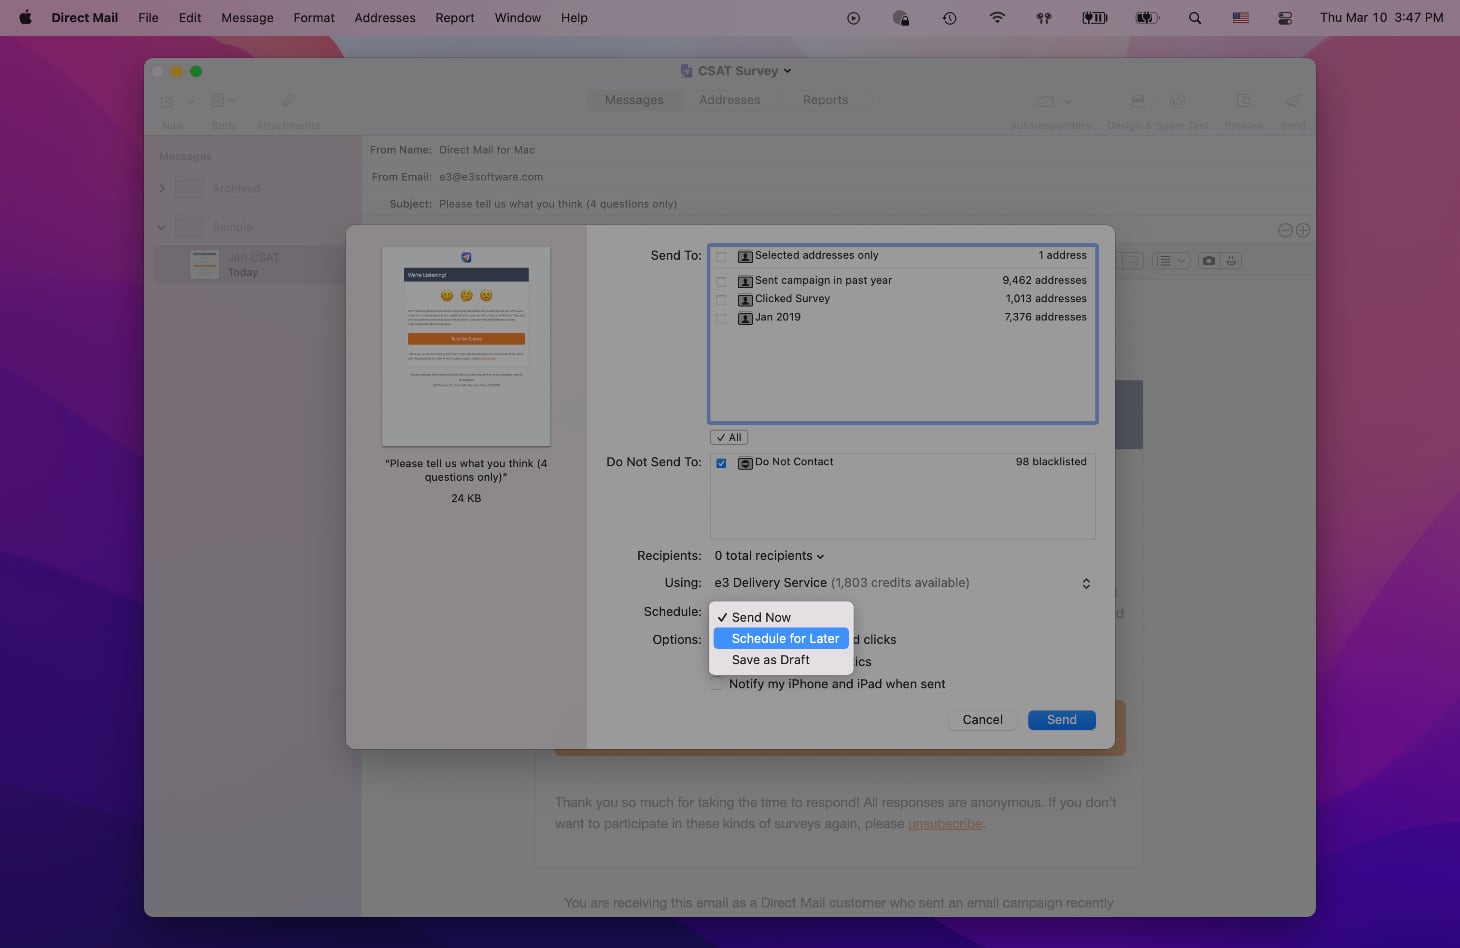
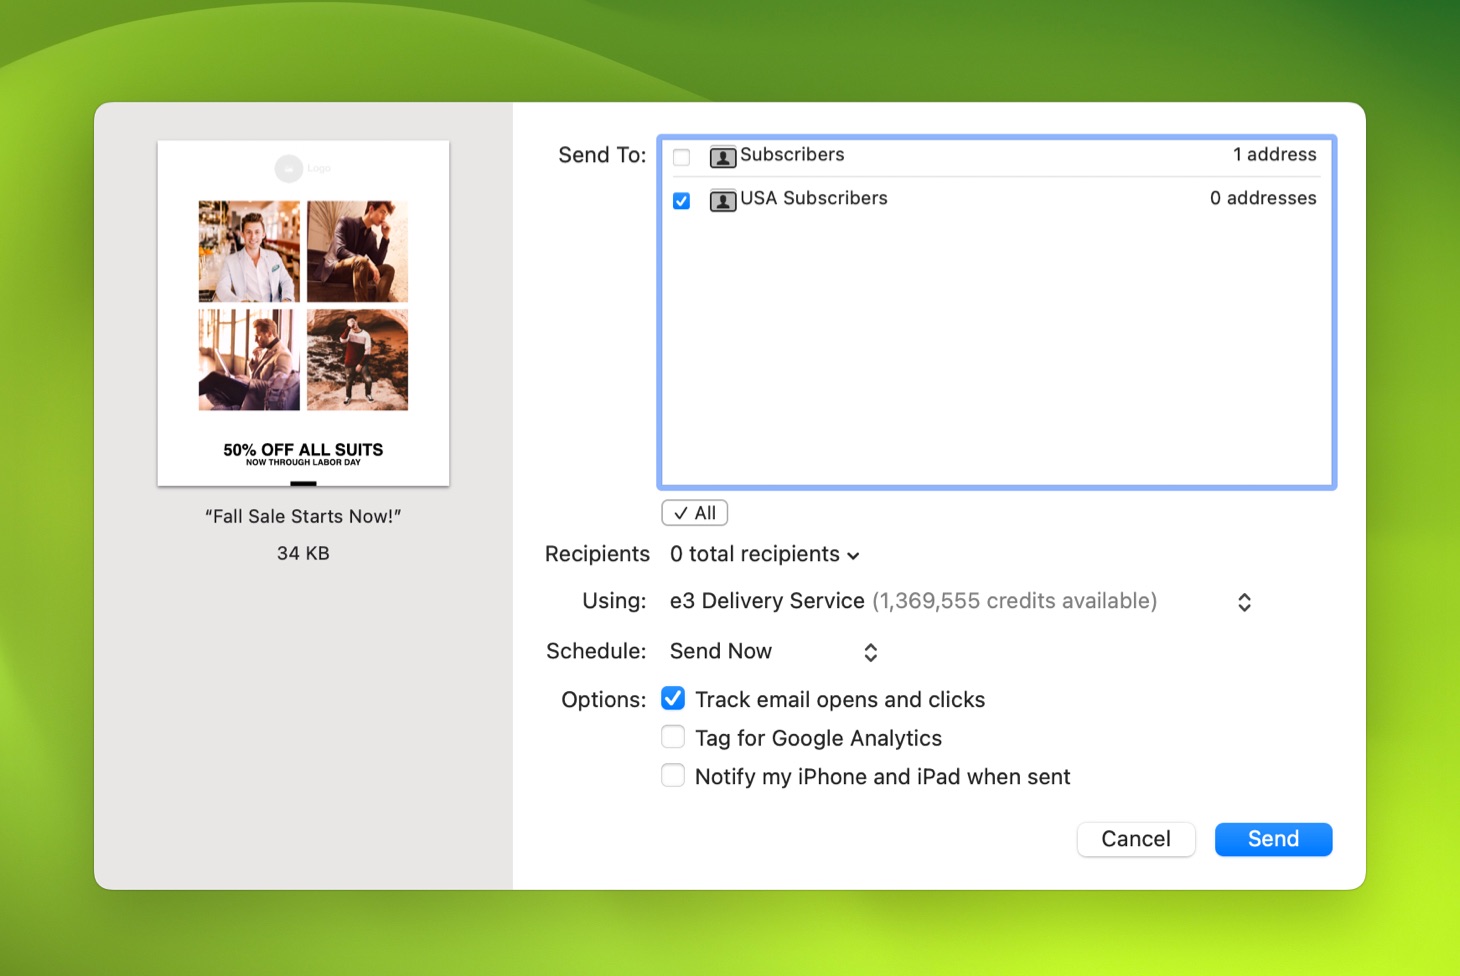
Click “OK” and Direct Mail will create the smart group and populate it with addresses that match the rules you specified. Smart groups automatically update as you add new subscribers, or when Direct Mail detects that their location has changed. When it comes time to send your campaign, select your smart group from the list:

That’s it!

About Geographic Location Accuracy

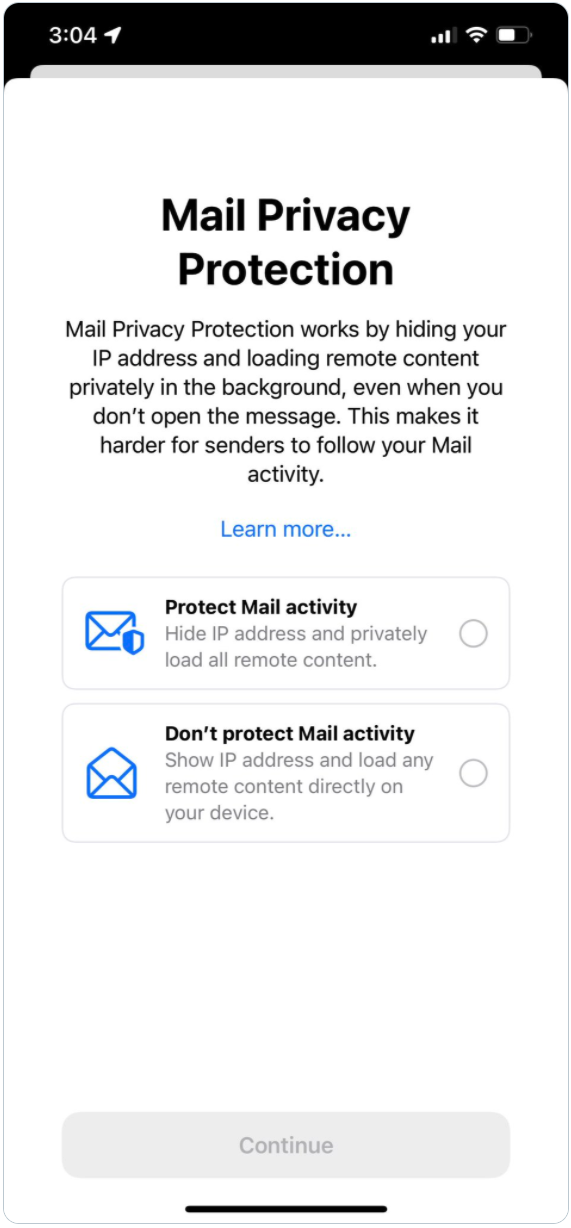
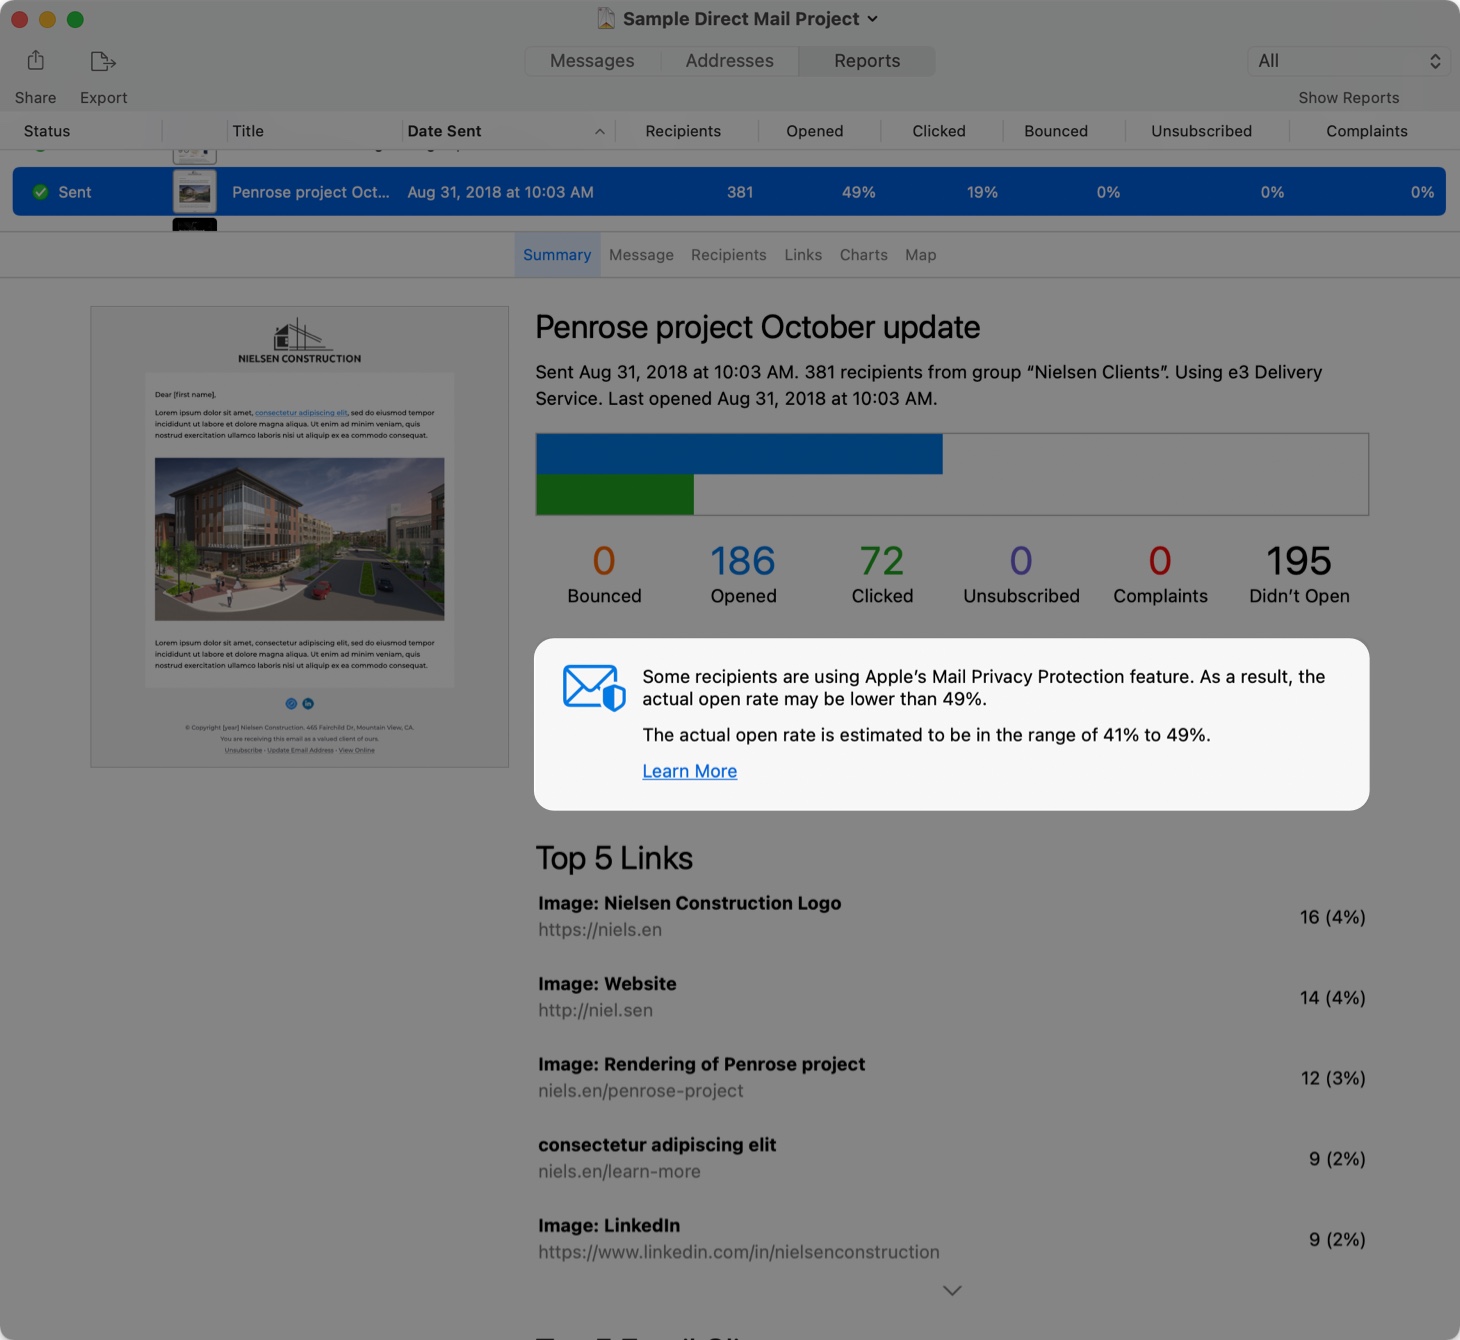
As mentioned above, Direct Mail uses the IP address of the subscriber to determine their geographic location. For most users, the location reported is accurate down to the city level. However, some subscribers may use technologies (like VPNs, proxies, or iCloud Private Relay) that prevent Direct Mail from determining any location, or only allow for country- or region-level accuracy.

Fall Holidays Outside the U.S.

The techniques described in this blog post apply equally well when targeting countries outside the U.S., too. Here are some upcoming fall holidays to be aware of for a non-U.S.A. audience:

  • Canadian Thanksgiving, 2nd Monday in October
  • Oktoberfest, Germany, Late September to Early October
  • Mid-Autumn Festival, China and Taiwan, September or early October
  • Harvest Festival, UK
  • Tsukimi, Japan, September or October
  • Diwali, India, mid-November
  • Dia de los Muertos, Mexico, October 31st to November 2nd
  • Beaujolais Nouveau Day, France, third Thursday of November

Conclusion

The fall season is full of holidays, festivals, and other opportune times for email marketing. If your subscribers are located in diverse locations, increase the effectiveness of your campaigns by targeting the right message to the right audience. Smart Groups in Direct Mail make it easy to filter your mailing list down to subscribers located in certain countries, or matching other criteria you choose. Targeted campaigns will always yield better results than generic ones. Have questions about smart groups? Please reach out to our customer service team!

Email Automation: How to Send Follow-Up Emails To Your Subscribers

Direct Mail’s email automation features save you time and energy, letting you focus on the core of what makes your business unique. There are a number of automations available in Direct Mail, but this blog post focuses on one in particular: autoresponders. Autoresponders make it easy to send email automatically to people on your list based on certain events and criteria that you specify. One common example that you may be familiar with is a birthday or anniversary email. We want to introduce you to another use case: sending automated follow-up emails to people who engage with your newsletters.

Sending follow-up emails can be a great way to provide relevant information or support to a lead or customer in a timely manner. For people who express an interest in your newsletter (by clicking a link, responding to a poll, etc.), you may wish to send them additional information, schedule a call or meeting, or just thank them for their response or interest. We explain how to set up this kind of automation below.

Planning Your Automation

Let’s cover what you need to get this automation up and running:

  1. Your mailing list
  2. An email newsletter that you plan to send out to your list
  3. A follow-up email to send to people that engage with your newsletter from step #2

Let’s skip over #1, under the assumption that you already have your mailing list set up in Direct Mail.

Let’s talk about #2. Make sure that your email newsletter includes links (or a feedback poll) that people can click on or interact with. It could be a link to a page on your website, social media post, video, or other content that your subscribers may find interesting and click on. The click will be what triggers the automated follow-up email to go out.

Lastly, create the follow-up email that will be used in step #3. Just like any other email in Direct Mail, you can include any kind of content you like (text, images, videos, links, etc.) and use mail-merge tags to personalize your message for the recipient.

Creating Your Automation

Now that you have all the pieces in place, let’s create the automation. By the time we’re finished, you will have sent your newsletter and configured an automation that sends out follow-up emails to the people who click your newsletter links.

Schedule the Newsletter Campaign (Or Save It as a Draft)

The first thing to do is schedule delivery of the newsletter that you created in step #2 above. You don’t want to send it out at this step, but you do need to schedule it to send at a future date (to give you enough time to set up the automated follow-up emails).

This is done by clicking “Send” in the toolbar, then clicking the “Schedule” pop-up menu and choosing “Schedule for Later” (if you know when you want to send it) or “Save as Draft” (if you’re not sure when you want to send yet).

Configure and Start the Autoresponder

Choose “Window > Autoresponders” from the menu bar, or click the Autoresponders button in the toolbar.

Give the autoresponder a name— this is just for your reference, your recipients won’t see it.

Next, click on the pop-up menu and select the follow-up email that you created in step #3 above. This is the email that will be sent out automatically.

Next, choose the event that will trigger the follow-up email. In this case, choose the option titled “Clicking a link in an email campaign”

Next, choose which email campaign you want want to watch for clicks. This should be the newsletter campaign that you just scheduled to send. You can pick and choose which links in the newsletter will trigger the follow-up email. You may choose all of them, or just the links that are relevant for your follow-up email.

If you want to delay when the follow-up email is sent, or adjust other advanced options, you can do so by scrolling down to reveal those settings, but the defaults should cover most cases.

The final step is to click the Start button in the toolbar (look for the “play” icon ▶️). Congratulations 🎉, your autoresponder is up and running!

Monitoring Performance

When your newsletter campaign is sent out, the autoresponder will watch to see who clicks the links that you specified. As soon as the link is clicked, your follow-up email will be sent automatically—even if Direct Mail is not running on your Mac at the time.

Just like regular email campaigns, you can review the performance of your autoresponder campaign in the “Reports” tab in Direct Mail. You will notice some additional date-based filtering options to help you evaluate recent performance versus overall performance. The “Recipients” section of the campaign report will show you who has received the autoresponder thus far.

FAQ

What happens if a recipient clicks a bunch of links, or the same link multiple times?

Don’t worry, your autoresponder won’t send duplicate follow-up emails. They’ll receive the follow-up email after the first click, and subsequent clicks will not trigger an email.

What if I need to edit my follow-up email?

Your follow-up email cannot be edited while the autoresponder is running. If you need to make changes, pause the autoresponder (in the Autoresponders window), make your edits, and then resume the autoresponder.

When does my autoresponder stop running?

Autoresponders run indefinitely until you pause them (in the Autoresponders window). Note that autoresponders will be automatically paused if you remove your project from the cloud, or transfer ownership of your project to someone else.

What’s a draft?

When you schedule your email campaign to go out, there is an option to instead “Save as a Draft”. A draft campaign is simply an email campaign that is scheduled to go out, but that doesn’t have a send date specified yet. You can send a draft campaign at any time by selecting it in the Reports tab and clicking “Deliver Now” or “Schedule Delivery”.

Can my follow-up email be triggered by a click on an “email”, “telephone”, or “anchor” link?

No. Only “URL” links can trigger autoresponders. The other kinds of links (email, telephone, and anchor) are not tracked by Direct Mail and do not show up in the campaign report.

Conclusion

Spend your time focusing on the core of your business, and let Direct Mail’s email automation features take care of the rest. Our Autoresponder feature is a great way to automatically follow-up with subscribers in a timely manner as they engage with your newsletter content. Nurture leads, grow sales, build customer relationships, and more, all without lifting a finger.

Getting Ready for Apple’s New Mail Privacy Features

It’s that time of year again: cooler weather, back-to-school, and big new updates to iOS and macOS. This year, Apple is introducing a feature for its email apps that has the email marketing world talking. You may have heard about it already: Mail Privacy Protection. In this blog post, we’ll learn what this feature is, why it matters, and how you can continue to make sure that your emails get great results.

What is Mail Privacy Protection?

Mail Privacy Protection is the name of a feature that comes built-in to Apple’s Mail app on iOS 15 and macOS 12. The purpose of this feature is to protect the privacy of the inbox by making sure that email senders are unable to track if and when someone opens their email.

Users are prompted to turn on Mail Privacy Protection after upgrading to iOS 15

How Does Mail Privacy Protection Work?

Mail Privacy Protection seeks to disrupt how senders track email opens. Email tracking is traditionally done by embedding an invisible image called a “tracking pixel” into the body of an email. When the recipient opens the email, their email app requests and downloads this invisible image. By monitoring these requests, the sender can track when the recipient opens the email, which email app the recipient is using, and the geographic location of the recipient (based on IP address). Mail Privacy Protection disrupts this approach by always downloading all the images in an email (including the tracking pixel), even if the recipient never opens the email at all. In addition, images are downloaded via a proxy server that hides the actual geographic location of the recipient (although, in most cases, the proxy server is in the same general vicinity as the recipient). The end result is that the sender cannot be sure if the email was actually opened and read by the recipient, or if it was simply downloaded in the background by the Mail Privacy Protection feature.

Click tracking is not affected by Mail Privacy Protection and continues to work as before.

Why Does This Matter?

Mail Privacy Protection reduces the reliability of the “open rate” number in your email campaign report, but the impact will vary depending on how many of your subscribers end up using this feature. In order to have a significant impact on your open rate, a large number of your subscribers need to be using Apple’s Mail app, need to have updated to the latest version of iOS or macOS, and need to have opted-in to this feature (which we expect most people to do). According to Litmus, approximately 50% of emails are read using Apple Mail, so as people upgrade their software over time, we expect most email campaigns to be affected to some degree.

The introduction of Mail Privacy Protection gives marketers an opportunity to rethink how they evaluate the performance of their email campaigns. The open rate has traditionally been an important metric used to gauge the quality of a subject line, how engaged subscribers are, or the impact of a campaign. However, as that signal becomes less reliable, email marketers can look to other indicators like click rates, conversion rates, list growth vs. unsubscribes, etc. to evaluate performance. We discuss this further down below.

Direct Mail Works With Mail Privacy Protection

Direct Mail is ready for the changes brought on by Mail Privacy Protection. You may notice a couple of changes in the “Reports” tab in Direct Mail:

  1. In most cases, Direct Mail is able to detect if an “email open” event is coming from a device with Mail Privacy Protection enabled. This does not mean that Direct Mail can determine if an open is “authentic” (i.e. the user actually opened your email), but simply that the recipient’s email app has the privacy feature enabled. Look for the email client labeled “Apple Device (Mail Privacy Protection)” in the “Summary” and “Recipients” sections of your campaign report.
  2. In the “Summary” section of your campaign report, Direct Mail reports an estimated actual open rate, given as a range. This estimate will only appear if there are enough recipients using Mail Privacy Protection to have a material impact on the open rate (greater than or equal to a 1% difference). This same estimate is also shown in the Stamps app, and in the web-based campaign reports.
  3. When determining open rate, Direct Mail considers all of the “email open” events for a given recipient. For example, if a recipient opens your email twice, once from a device using Mail Privacy Protection and once from a device without, Direct Mail will know that the recipient did actually open the email and will factor that information into the estimate.

How You Can Prepare For Mail Privacy Protection

First and foremost, no need to worry. Email marketing remains the most effective form of marketing and one of the best performing sales channels, even as technology and the privacy landscape continues to evolve. We are here to help you understand and respond to these changes as they come. Here are some suggestions on how you can adapt as your subscribers adopt Mail Privacy Protection:

  1. Remember that “click rate” accuracy is not affected by these changes, and continues to be a very high quality signal of how engaged your subscribers are with your content. Consider including more “clickable” content (i.e. links and buttons) in your emails that entices your subscribers to click. Remember that you can turn any image into a link by clicking on it and entering a URL.
  2. Remember that the goal has never been to get the highest open rate, but rather to drive downstream conversions (i.e. sales, sign-ups, leads, etc.). Consider looking to other metrics to evaluate campaign performance:
    • Number of clicks
    • Number of forwards or social media shares. These appear on your campaign report as clicks on the links titled [forward to a friend url], [twitter share url], etc.
    • Number of goal conversions on your website. You can use Direct Mail’s integration with Google Analytics to link up conversions on your website with the email campaign that brought them there.
    • Number of unsubscribes (the lower the better 😀)
  3. A/B testing based on open rates may no longer be a good idea, but continue to strive for quality subject lines (here are some best practices) and content. You can also use Direct Mail’s Preview Text feature to stand out in the inbox. In the past, many privacy-conscious users turned off all email image loading, missing out on the great visual content in your emails. The introduction of Mail Privacy Protection means that many of these users will now turn on image loading and engage more with your emails.
  4. The campaign report and the subscriber “Get Info” window both show times and dates for each email open. Remember that opens from “Apple Device (Mail Privacy Protection)” may not, in fact, be authentic opens, and the accompanying dates and times are simply when the tracking pixel image was requested.
  5. Some email marketers like to segment their mailing list based on the open rate, as a proxy for how “engaged” the subscribers are. This may no longer be the best idea. Instead, consider segmenting based on click rate or some other custom criteria that you import into Direct Mail. You can use our Zapier integration or API to keep your mailing lists up-to-date with data from other sources (like e-commerce stores, spreadsheets, or databases).
  6. If you are running autoresponders that are triggered by email opens, you should consider changing them to be triggered by a click, or triggered on a time delay. In Direct Mail, once an autoresponder is created, you cannot change the trigger type, so you’ll need to create a new autoresponder in its place.
  7. Direct Mail relies on the recipient’s IP address to determine geographic location. While Mail Privacy Protection does hide the recipient’s actual IP address, the proxy IP address is typically in the same general location (i.e. same city, or at least same country and time zone). As a result, Direct Mail is still able to determine the approximate general location of the recipient.

We’re Here For You!

We are committed to helping you run successful email marketing campaigns and to growing your business. If you have any questions about Mail Privacy Protection, or email marketing best practices, please don’t hesitate to contact our support team. Be sure to sign up for our mailing list, too, and get notified about great new features rolling out soon to boost newsletter engagement and interactivity!

Enhance Your Email Marketing With Video

Online video is ubiquitous these days. Social media, advertising, and entertainment platforms are all moving to focus on video. What about email?

One of the most common questions we have received lately is how to integrate video into marketing emails. In this blog post, we’ll share ideas on how you can using video to enhance your email marketing efforts, and show you how easy Direct Mail makes it to add videos to your emails.

Grow Your Lists, Increase Engagement

For email marketers, the name of the game is engagement: how can we increase the number of people who sign up for, read, and click through our emails? Given our ever-shrinking attention spans, video can be an effective way to increase engagement with your emails:

  • Video marketing company Wistia ran a number of tests and found that including video thumbnails in marketing emails yielded a 22% lift in clicks.
  • Video platform Vimeo has tools you can use to collect email addresses from the folks who watch your videos. Videos can be great lead magnets.

We’re not affiliated with Wistia, but they do have a number of other guides you may find helpful:

How to Insert Video Into Your Email

Direct Mail makes it super easy to add video content to your email, but first you need to make sure that your video has been uploaded to a video platform. YouTube and Vimeo are both popular choices and are integrated with Direct Mail. After you’ve uploaded your video, open Direct Mail, click the “Insert Content” button, choose “Video”, and click the spot in your email where you’d like place the video.

Next, paste in the URL to your video. Direct Mail will automatically grab a thumbnail of the video and insert it into your email. You can optionally choose the style of play button that Direct Mail overlays on top of the thumbnail.

When your recipients click on the thumbnail, their video will open in YouTube or Vimeo and automatically start playing.

Can I Play the Video Directly Inside the Email?

Unfortunately, no popular email app supports playing video from YouTube or Vimeo directly in the body of the email. If this ever changes, you can be sure that Direct Mail will support this feature! Until then, the video thumbnail + play button combination should be well understood by your recipients.

If including some motion in the email itself is critical to your design goals, you can consider creating an animated GIF of a few frames of your video. The GIF can then be inserted into your email with a link to watch the rest. Here are a couple resources to help you with that process:

Be careful with this approach, as even short animated GIFs can end up taking a super long time to download. Just watch that the size of your image file doesn’t exceed a few megabytes.

Conclusion

Video content has always been popular, and the story is no different in our online world. Using video to enhance your email marketing efforts can yield a larger subscriber list and increased engagement. Direct Mail’s built-in template editor makes it easy to spruce up your emails with video content, too.

Want more info on combining video with your email marketing? Have a question about something else? Please reach out to our support team today!

Grow Your List With Lead Magnets

Growing your mailing list is one of the most effective ways to grow your business. Consider the following statistics:

  • There are over 3.9 billion daily active email users world-wide
  • The average click-through rate for email campaigns is 2-4%, compared to just 0.9% for Facebook (or 0.4% for LinkedIn)
  • 65% of U.S. consumers have made a purchase based on a message they received via email, compared to just 20% via Facebook or 6% via Twitter (source)

As you make plans for 2021, email marketing and growing your list should be a top priority! In this blog post, we discuss a highly effective method you can use to attract new subscribers to your mailing list: lead magnets.

What’s a Lead Magnet?

Simply put, a lead magnet is an attractive piece of content or valuable item that you offer visitors to your website in exchange for them handing over their name and email address. For example, a lead magnet could be an e-book or digital guide in an area of your expertise, access to a webinar, or a template or resource.

 The good folks over at The Balance put together a great explainer with excellent ideas and examples of lead magnets:

How Do I Create a Lead Magnet in Direct Mail?

The first step is creating a subscribe form to capture your new leads (choose Addresses > New Subscribe Form… from the menu bar at the top of your screen). Here’s an example.

Sample email sign-up form

The next step is creating the message that will be sent to your new leads. The message should contain the digital content or item that was promised in exchange for signing up. For example, you could include a link to the item or include it directly as an attachment.

Example lead magnet email

The next step is creating an autoresponder that will automatically send your message to anyone that signs up for your list. This help article explains how to do that.

Example autoresponder

Now your lead magnet is set up. The final step is simply sharing the link to your lead magnet (i.e. the sign-up form you created). Here are some ideas:

  • Add a link from your website to your lead magnet
  • Embed the form directly on your website (or WordPress blog)
  • Add a button to your business Facebook page
  • Pin a tweet with the link to the top of your Twitter feed
  • Promote your lead magnet on social media
  • Add the lead magnet link to your email signature

Year-in, year-out email marketing continues to provide the best return on your marketing dollars. As you make plans for growth in 2021, be sure to focus on your mailing list and consider using a lead magnet to boost your subscriber count.

If you have any questions about setting up a lead magnet, please don’t hesitate to reach out to our support team!

Page 1 of 3